 Slide Guitar
Okay, sorry about not getting a lesson in last week, it was a busy week, what can I say.
So this time I want to talk about some basic slide guitar in standard tuning.
When doing this technique it is best to have your action a little higher than it would be for your normal fretted guitar playing. If you don’t know, action is the string height which can be adjusted via the saddles on the bridge of a guitar. Raising the action makes it easier to slide and causes less fret noise which is the enemy of slide players around the world. I don’t raise my action but then again, I have been doing it for long enough to get around that problem somewhat but for a beginner, having a guitar with a bit higher action can really help to get the technique off the ground.
As for what type of slide to use, brass or glass, I follow the Jeff Beck idea; brass for acoustic, glass for electric. Seems to work for him, and so it should work for the rest of us. 🙂
One of the main problems when I see people starting to play slide is, they press the slide down on the fretboard. That is WRONG. What you want to do is let the slide rest on the fretboard, no pressure, or very little, that way the notes you are sliding on do not fret out.
I prefer to use the slide on my pinky that way it allows me to use the fingers of my fret had to mute and play notes behind the slide. I have seen other players use all other fingers as well. There are advantages and drawbacks to using it on your pinky, same as when you use it on other fingers. Using your middle or index for the slide allows better control but then you give up the muting ability and will not be able to fret behind the slide.
Another problem people tend to have is that other strings ring while they are sliding. This is alleviated by using a combination of the fret hand fingers and pick hand fingers to mute strings that are not needed in the lick.
When sliding to a note, you want to slide to directly over the fret, not between frets, another misconception. If it says fret 8, try to center the slide right on fret 8.
If you can get the slides sounding clean with no notes fretting out, then you can try to throw in some vibrato. This is achieved by moving the slide back and forth over the fret from headstock to bridge evenly over the intended fret. Strive for an even vibrato that has a rhythm. This takes a long time to get good at so don’t be too down about not getting it right away.
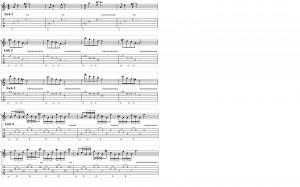
I have written down 3 simple licks and a 4th one which is more complicated that uses the behind the slide technique which I am just starting to mess around with myself as you can see (and hear). I became aware of the behind the slide technique from a guitarist named Sonny Landreth. If you haven’t heard of him you should check him out, he slays!
Anyway, study the diagrams, tabs and video, at the end of the video I play the licks slowly so you can see what I am doing exactly.
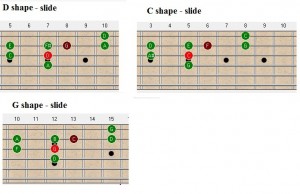
For each position there is a range of notes I use that correspond to the chord I am playing over. The progression is in the key of G and starts on the V chord (D), then goes to the IV chord (C) and finally the I chord (G).
Click to enlarge the diagrams:
The red note is the root and the maroon notes are passing tones (don’t land on them on a strong beat or hold them). The green and red notes can be held over the chord and all sound good.
Memorize the patterns I use and try moving them around using the root notes for guidance.
Here is the tab for the licks themselves.
Click to enlarge the tab:
Enjoy!

